When it comes to custom hat design, visualizing your concept before production is crucial. After all, hats mockups are the perfect way to see how your designs will look in real life. Whether you’re a designer, a business owner, or a creative enthusiast, using mockups ensures your final product meets expectations. Moreover, they help you make adjustments early on, saving time and money. Learn how to create hats mockup designs to preview your custom hats. Use professional mockup tools to showcase your creative ideas.
What Are Hats Mockups?
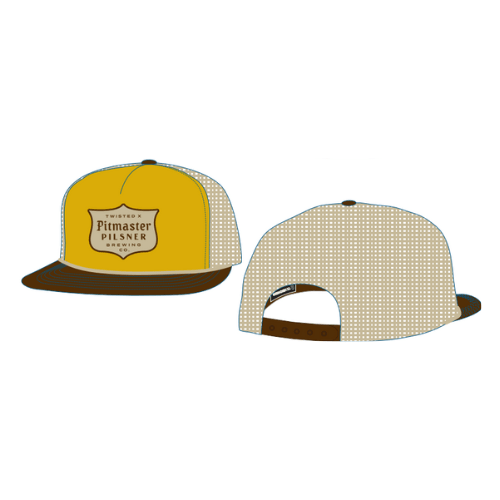
A hats mockup is a digital or physical representation of a hat with your custom design applied. Essentially, it provides a preview of how your design will appear on the final product. Additionally, mockups help in several ways:
- Visualize your design in 3D: See your concept come to life from all angles.
- Communicate ideas to clients or manufacturers: Share a clear representation of your design vision.
- Test different styles, colors, and placements: Avoid committing to physical samples until you’re satisfied with the results.
Why Use Hats Mockups?
Hats mockups are essential for several reasons:
- Quality Assurance: They allow you to identify potential design issues before production.
- Client Approval: Mockups provide a professional way to showcase ideas to clients and gather feedback.
- Marketing Materials: Use realistic visuals to create compelling content for online stores, advertisements, or social media.
Therefore, mockups are not just about design; they also play a key role in communication and marketing.
Types of Hat Mockups
When it comes to hat mockups, there are two main types:
Digital Mockups:
These are created using design software like Adobe Photoshop, Illustrator, or online tools. As a result, they allow for unlimited experimentation without the need for physical resources.
Physical Mockups:
These involve blank hats and transfer materials to create a tangible prototype. Although useful for presentations, physical mockups require more time and resources than digital ones.
How to Create Hats Mockups
Step 1: Choose the Right Mockup Tool
To get started, selecting the right tool is key:
- Adobe Photoshop: Use mockup templates with smart objects for a professional look.
- Canva: A beginner-friendly option for creating quick mockups.
- Online Platforms: Websites like Placeit or Smartmockups offer pre-designed hat mockups that simplify the process.
Step 2: Select a Hat Style
Next, choose a style that aligns with your design goals. Popular options include:
- Snapbacks
- Trucker Hats
- Beanies
- Bucket Hats
Step 3: Add Your Design
Once the style is selected, it’s time to add your artwork:
- Upload your logo, text, or custom artwork.
- Adjust the placement, size, and colors until you’re satisfied.
- In addition, ensure that the design fits the proportions of the selected hat style.
Step 4: Customize Backgrounds and Lighting
Finally, enhance the presentation by adding realistic lighting and backgrounds. This step ensures your mockup looks polished and professional.
Tips for a Professional Hat Mockup
To create a truly standout mockup, keep these tips in mind:
- Use high-resolution images for clarity: This ensures the final design looks crisp and professional.
- Ensure your design placement matches real hat proportions: Double-check alignment to avoid surprises in production.
- Experiment with angles: Showcase different perspectives to provide a comprehensive view of the design.
Ultimately, these details make a significant difference in the final presentation.
Hats Mockup with TX Headwear
Fortunately, TX Headwear simplifies the entire mockup process with its intuitive online design platform. Preview your custom hats in real-time, allowing you to tweak every detail until it’s perfect. Whether you’re adding embroidery, patches, or printed designs, TX Headwear’s tools make it easy to bring your vision to life.